
When installing crucibles, we’d better follow the correct ways to ensure their safe and effective usage. Here are some suggestions:
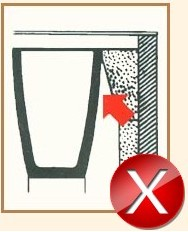
Incorrect Approach: Avoid leaving minimal space between the supporting bricks and the crucible. Insufficient space can hinder the expansion of the crucible during heating, leading to cracks and potential failures.
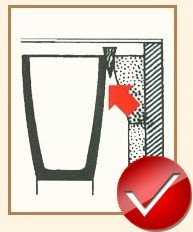
Recommended Approach: Insert small wooden pieces between the crucible and the supporting bricks. These wooden pieces will burn away during the heating process, creating sufficient space for expansion.
Precautions during installation:
Prior to installing the crucible, inspect the furnace interior. The furnace walls and floor should be intact without any metal or slag residue. If there is cement or slag adhering to the walls or floor, it must be cleaned. Otherwise, the flame's progression may be obstructed, causing localized overheating, oxidation, or small holes on the crucible walls.
Supporting the crucible base:
When installing the crucible, use a sufficiently large cylindrical base that equal to that of the crucible's base. The base should be slightly larger by 2-3 cm, and its height should exceed the tap hole to prevent direct exposure of the crucible base to the flame. This helps prevent rapid erosion of the base material, which could lead to the crucible becoming conical or cracking due to uneven stress on the base.
To prevent adhesion between the crucible and the base, place a layer of insulation material (such as fine refractory sand or cardboard) between them.
When using a tilting furnace with a falcon-type base, ensure that the protrusions on the base match the crucible's grooves. If the protrusions are too high or large, they may exert excessive pressure on the crucible's base, leading to cracking. Additionally, after tilting, the crucible may not be securely fixed.
For crucibles with long pouring spouts, it is essential to provide an adequately sized base and secure the crucible's support. Inappropriate base support can result in the crucible "hanging" solely by the spout inside the furnace, leading to breakage from the upper part.
Clearance between the crucible and supporting bricks:
The gap between the crucible and the supporting bricks should be sufficient to accommodate the expansion of the crucible during heating. Placing combustible materials (such as wooden pieces or cardboard) directly between the crucible and the top supporting bricks can create the necessary space. These combustible materials will burn away during the crucible's heating, leaving behind enough clearance.
In furnaces where exhaust gas is discharged from the side, sealing the gap between the crucible and the furnace wall with insulation wool and fixing it with high-temperature resistant cement is advisable. This prevents oxidation and cracking of the crucible's top due to improper sealing at the furnace roof. It also protects the heating elements during upward expansion of the crucible.
(Note: It is recommended to use a crucible cover to prevent oxidation, top cracking, and corrosion. The inner edge of the crucible cover should cover the inner surface of the crucible up to 100mm to provide better protection against external impacts and oxidation.)
In tilting furnaces, below the pouring spout and at half the height of the crucible, place one or two supporting bricks to secure the crucible. Insert cardboard between the crucible and the supporting bricks to maintain adequate space and prevent hindrance during crucible expansion.
By following these guidelines and adhering to proper installation practices, the performance and lifespan of crucibles can be maximized. Ensuring a safe and effective crucible installation
Post time: Jun-25-2023
